|

A4 Stock Olds Aluminum Intake - Found on 82 to 84 307's with the
5A heads. Can be identified by the "A4" on the intake located just behind the thermostate housing toward the passinger side.
This intake is loaded with problems, first it has the most casting flaws of any Olds intake, second it has ridges
on the base of the plenum. Casting flaws can be smoothend out easy with a dremel so I wont focus on that. Lets talk about
the ridges. The ridges are on the floor of the plenum (just under the carb), this might be good for low throttle torque and
throttle responce but it kills top end flow. The A4 has ridges because it was installed on very low performance
engines (bone stock 307's) that wouldnt flow enough to keep the velocity high enough in the intake for good atomization, so
the ridges were added to create turbulence, turbulence will stur up the intake charge and help fuel atomization. But
turbulence will kill overall flow and peak HP, so if your looking for peak HP the ridges are not a good thing. On the
A4 there is so little room between the plenums floor and roof of the runners. These ridges run right into the runners up untill
they split (heading toward the heads). These ridges take up so much space (in that area between the plenum and the runners
sharp turn and split) that I assume this is the area of restriction, then add turbulence and this is getting nasty. I
have seen people port out the A4 and smoothen down the ridges, this is not a bad idea. So the intake is not useless, it just
needs some work. A port match is a good idea as well.
17 Stock Olds Cast Iron Intake - This intake can be found on some
307's from 82 to 84, all 307 on E body toronados and Riviera's and 77 and latter 350's with the 3A heads. Can be identified
by the "17" on the intake located just behind the thermostate housing toward the passinger side. This intake is identical
to the A4 intake mentioned above, except its made out of cast iron instead. And for some reason it has less casting flaws
than the A4, but it still has them power robbing ridges on the plenums floor. I dont know what to say, I mean its better than
the A4 in terms of less casting flaws but its worse in terms that its heavier.
16 Stock Olds Intake cast iron - This intake can be found on 77 to
79 Olds 403 engines. Can be identified by the "16" on the intake located just behind the thermostate housing toward the passinger
side. I like this intake out of all the stock intakes the best. Why? Because it dont have the ridges on the plenums floor!
This intake has the same port runners and plenums as the A4 and 17 mentioned above but it does not have the silly ridges the
A4 and 17 has, so basicly this intake will out power the A4 and 17. This would be my intake of choice if I was to choose a
stock Olds intake. Sure the A4 is lighter but what is weight loss if it comes with power loss? The 16 will out perform the
A4 and 17 at RPM's above 4600, it breaths better and runs through the top-end with more authority. It wont beat the Edelbrock
Performer in top-end power, but its close. The only stock intake that can beat the 16 (in my eyes) is a A4 that has been ported
to remove the flaws, and has had the ridges grinded down flat. Again port match any intake.
How to PORT MATCH a intake manifold to the heads. Port matching
is a good idea, it assures the intake manifolds port runners match up perfectly to the intake ports on the heads. Heres the
how too.
First use felpro intake gaskets for this job because they are the only ones I found to perfectly
match up with the heads, but intake manifolds never match up so thats why we gotta port match them.
1. Take a old intake
gasket turkey tray and install the intake (thats gonna be port matched) on the engine. Torque down to specs.
2. Remove
the 4 intake bolts on the 4 edges of the intake.
3. Use a small drill bit and drill 4 small holes in the intake just over
the holes of the 4 bolts you just removed (One per bolt hole of course). Drill through the intake and intake gasket, untill
it just barely starts to go into the head. No need in going in the head, just go enough to make a mark on it. (Check pictures
below)
4. After doing that to all 4 corners, remove the intake and gasket.
5. With the intake and gasket off the car.
Now you can hold the gasket up to the intake and match the 4 holes you drilled though the intake and gasket.
6. With the
intake gasket held on the intake and the 4 holes matched up, take a razor and scrub on the intakes flange around the outer
edge of the intake gaskets ports (tracing the size, location and shape of the intake gaskets port onto the intake manifold).
This will be used as a guide when your porting out the intake. Make sure to do that to all 8 intake ports
7. Now remove
the gasket and start port matching. Start on the outer edge of the intakes port, bring the port size to about 0.5mm away from
the mark you scrubed on it with the razor (becuase its always better to undercut then overcut).
8. After getting the ports
opening to the size and shape of the scrubed mark then proceed to slow taper the opening of the ports inward into the intake.
You should only take it in about 3 inches if your just port matching the intake. By 3 inches it should be tapered to match
the original surface in such a smooth manner that you cant tell were you tapered it at. If its a full port job then use this
size and shape as a guide all the way in if possible.
9. When your all done, take the new intake gasket and drill 4 holes
in it in the same exact location as the old intake gasket used for the porting. Just hold the two gaskets over eachother to
get the perfect location to drill.
10. After drilling the 4 holes place the new gasket on the engine and press in the gaskets
locating pins so the gasket is perfectly in place.
11. Varify the 4 holes drilled in the intake gasket matches the 4 holes
drilled in the heads. It does! Good!
12. Install the intake and new intake gasket with normal torque technics but keep
a close eye on all the 4 holes, making sure the intake is falling back into its original position along with the intake gasket.
13. When your all done you should be able to look into every hole you drilled and see through the intake, intake gasket
and right onto the head. At this point you can be sure that it is all "port matched"
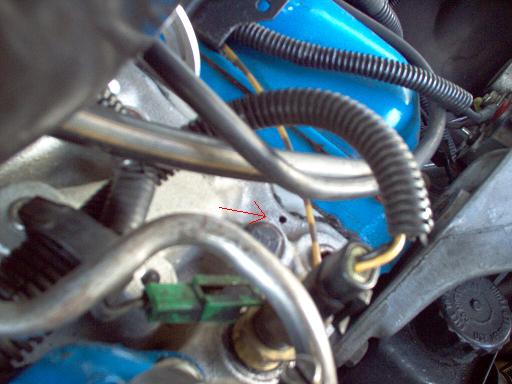
| On this picture notice one of the 4 holes drilled |
|
On the above picture, notice were I drilled one of the 4 holes. This is a good
location.
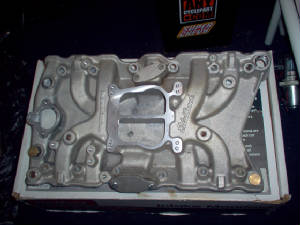
On the picture below, finished product. This is a perfect port match on
my performer intake. If you know what these look like out the box you will know that the port runners on these are never that
perfect.
|