Performance Olds 307
Carburetor & Intakes 1
Home
Understanding The ECM & System
ECM
Cold Air Induction
Ignition & Spark
Tuning The Q Jet
Carburetor & Intakes 1
Carburetor & Intakes 2
Intake Manifolds
Cooling
Transmissions
Exhaust
Great Links
Who's The Man!!!
Contact Me!

 If you have not rebuilt your Carburetor then I suggest you do so before making any major modifications  because GM placed "tamper free caps" over all adjustment screws on these electronic Q jets to keep "hill billy joe bob jim and his half brothers" from making unskilled adjustments that might effect emissions but who cares about stinkin clear air we are looking for more power right! Gotta polute to scootstick out tongue ! No really though with a good catalytic converter you should have no problem passing emission test even if the whole ECM and emission componites where taken out and replaced with vacume units so for you people that need to take a smog test just remember to keep good cats and you will have nothing to worry about. With the carb taken apart during rebuild it is easy to remove these "tamper free caps" to gain access to the adjustment screws and then you will be able to adjust and tune the carb any time you need too. You will need some special tools to tune these electronic Q jets, they are "Double D" drivers and a real small Hex driver, these are to adjust the M/C solinoid and TPS sensor inside the carb, you can find these at some of your better auto parts stores or the dealers if all else fails they should not cost more then 15 or 20 bucks, Here are the GM part numbers for these tools this might help your part dude locate these tools for you, the tool to adjust the main metering of the M/C solenoid is J-28696-10, BT-7928, that is for part to full throttle mixture control of the primaries. The TPS senser needs the tool # J-28696-10, BT-7967A, the Idle mixture needles need tool # J-29030-B, BT-7610B. And the idle air bleed needs this very rare and hard to find tool called a "flat head" .
 If you have reason to beleave that the secondaries (4 barrels ) are not opening then you might want to make sure that the cam that lifts the secondaries needle hanger is in place because some of the 307s came governed from factory with no needle hanger cam and a plastic hook down by the gas peddle to keep you from taking the gas peddle that far down. My Rivi was like that and I have found many more in the junk yards like that as well. After buying my car I was wondering why my secondaries would not open then as I was laying on my floor board looking up at my gas peddle I noticed this plastic hoop that limited the peddle from going all the way to the floor, I removed that but then my car would bog on WOT and never take off so then I found that the secondary needle hanger cam was also missing, Replaced that and I was in back in bizz!!!
 All 307 Olds have 4 barrel intakes, the 5A head 307s can be found with two different intakes (scroll to the bottom of this page to see a picture showing where the indentifying casting mark is on your 307s intake)
 1. A4 intake is a aluminum intake and it lighter but the intake ports in the runners seem to be a little smaller
 2. 17 intake is a cast iron intake and is heavier but the intake ports in the runners seem to be a little larger maybe because the 17 was first used on the 350 Olds
   The 7A head 307s had only one intake and only one will work and thats the A5 intake, it is aluminum but just like the 7A heads the A5 intake has much smaller ports. No other intakes will work proper on these 7A heads because the ports won't match up right.
 I have left links on the bottom of this page to other good pages on the same subject, Enjoy! Cool

Arrow Getting the secondaries to open fully is a 5 minute job only tools needed is a pair of needle nose plyers. If you have a backed up exhaust or never replace your air filter then this modification will not be noticable on the road because you have other restrictions to worry about first but if you have a decent flowing exhaust and clean air filter with a good flowing breather box than you could use better flowing secondaries on your electronic Q Jet carburetor for more top end power most noticable above 4000 RPMs. Follow the pictures with instructions below as I try my best to explain this most simple modification Thumbs up .

picture3.jpg

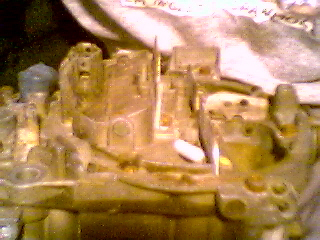
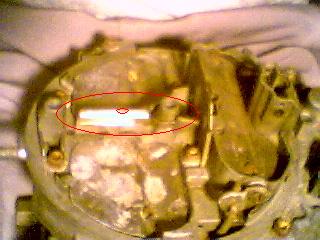
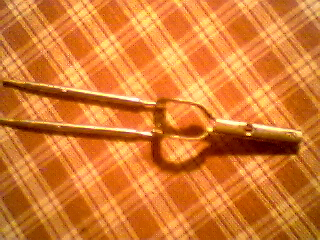
The picture above shows how far the stock secondaries air valve opens before modification.

picture2.jpg

The above picture shows how far the secondaries air valve should open after this modification. The front side of the secondary air valve will open to a full vertical angle when done.

normal.jpg

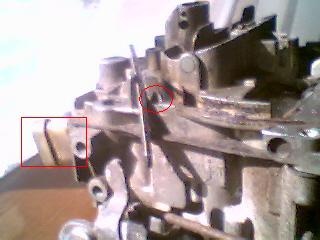
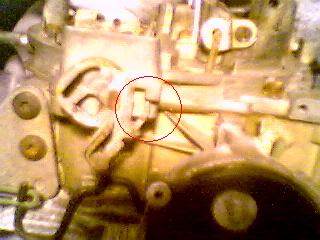
Above picture is the passinger side of the carb, if you follow the secondary air valve shaft to this side you will see the area I have circled, This is with the air valve in the closed position. This area is what controls how for the secondaries are allowed to fully open by using the "stop" circled in the picture.

beforebent.jpg

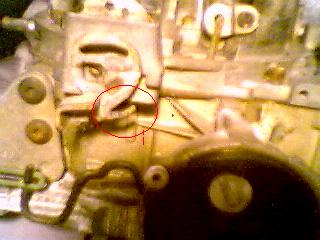
Above picture is with the air valve fully open notice the shafts end is rested on its "stop" circled in picture.

bent.jpg

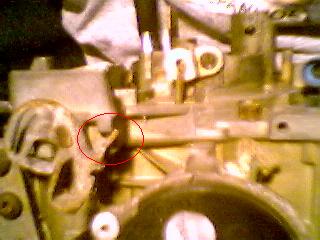
Above picture was taken after the "stop" was modified to allow the air valve to open further than stock, notice the "stop" was bent over to the right so that the air valve's shaft has to rotate further before the "stop" makes contact with the carbs body. I used needle nose plyers to bend it just to the right, use the picture as a guide of how far you should bend it, remember the front side of the air valves flap should open to a full vertical angle when you are finished. I have read that some people like to grind the "stop" shorter to acheive the same results but grinding leaves you stuck with it that way and is not reversable, if you just bend it like I explained and you end up not likeing the result then all you got to do is bend it back and all will be back to normal! Simple as that Cool.  Good Luck!!! 

Lightbulb Now you got more intake you could take advantage of more fuel in there as well. You can go and invest in some richer secondary needles and hangers or you can modify the ones you have now.

picture66.jpg

This is where the secondary needle hanger sits, it is held in with on screw.

picture77.jpg

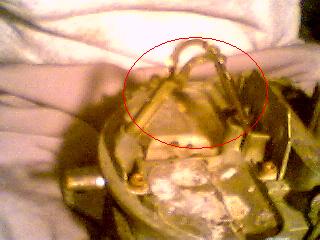
After removing the screw lift the hanger slowly, the needles are attached to the hanger and will be lifted out with the hanger.

picture8.jpg

This is the needle and hanger, if you look at the hanger you will see a letter stamped on it, that is so you can tell how rich the hanger is. The lower in the alphabet the hangers letter is the richer the hanger so a hanger labled "K" will be richer than a "S". If you grab a hand full of hangers from the junk yard at different letter code then you can fine tune the secondaries needle hangers by swaping for leaner or richer ones. Note: the hangers have the most effect on the secondaries fuel ratio during the first 60 feet of the launch, after that the secondaries needles have more of a effect on the fuel ratio.

picture11.jpg

If you cant find some richer needles at the junk yard and dont want to pay full price for new ones just for "trial and error" than you can take some spare stock 307 secondary needles and smoothly grind the needle point a little sharper but dont go crazy, a little does alot. Gring only the last 10mm's of the needle. If you look at the picture above the needle on the right is stock and the needle on the left was grinded a little thinner for a richer mixture, make sure both needles are equally grinded. it is very important that they stay the same lenth as stock, if you shorten the needle it can get hung up Contact Me! If you have any questions!

ArrowAdjusting the TPS sensor. The TPS is the Throttle Position Sensor and it tells the ECM how much peddle you the driver are giving the car, this sensor is located on the front, drivers side of the carburetor and it has 3 wires connecting to it with a terminal on the front, drivers side of the carb. This sensor takes a special tool to adjust ( GM tool # J-28696-10, BT-7967A ) you should be able to pick these tools up at a good local auto parts store at the parts counter for less then $10. The TPS does have "the tamper free caps" over the adjustment screw so if this carb has never been rebuilt or has never had the TPS sensor adjusted then you might have to remove the cap yourself, the cap is about 3mm's wide, is silver and located just over the TPS on the top of the carb. The cap can be removed by using a really small drill bit, making a small hole into the middle of the cap (not too deep so you dont destroy the adjustment screw located just underneth) and screwing a small screw into the hole then pulling on the screw to pull the cap out. Too check and adjust Arrow

The red square in the picture is the TPS terminal
tpslocation.jpg
The red circle in this picture is the location of the TPS adjustment screw.

 1. Ok First you will need the tool to adjust the TPS sensor, it dont cost much a good auto parts should carry it also you will need a multimeter but it must be digital, last you need to make sure that the tamper free cap is not blocking you from adjusting the TPS if nessasary.

 2. Take your ECM out of its resting place but keep it connected to its harness and remove the blue caps that cover the wires at the terminals of the ECM so you can gain access to the rear of the terminals with a volt meter.

 3. Next is leave the terminals connect to your ECM but take the (+) side of the meter and slide it in the rear of the terminal on slot 2 and take the (-) side of the meter and ground it out to your ash try or something metal to get a ground. If you do not know which one is terminal (Pin) 2 then look on my page called ECM , I have a chart with all the (pins) on a ECM's terminals located toward the bottom of the ECM page

 4. Now start the car and tap the gas once or twice to settle the carb, with the volt meter set on 20 VDC you should have a reading of 0.37 to 0.43 VDC now shut the car off but turn the key to the run position, press the gas and check to see if the TPS reading raises as you press the gas peddle to make sure the sensor has no "dead" spots, at full throttle it should read over 4.00 VDC. If it has dead spots, is not reaching its lowest voltage or not being able to go higher then 4.00 on full throttle then the TPS might need to be replaced.

 5. If its not within that range of 0.37 to 0.43 VDC then you will need to turn the TPS adjustment screw which is located next the the TPS sensor in a little hole the "tamper free cap" used too cover, Turn the adjustment screw too get the voltage within that range around 0.41 then test drive paying attention to your TCC lockup, at cruising aroung 50 MPH you should have lockup but as soon as you let go of the peddle it should come unlocked and as soon as you lightly press the peddle to resume cruising it should lock right back up. Did I explain this good? If you have any questions Contact Me!

Make sure you check out the second page to this subject > Carburetor & Intakes 2

Post  The links below are very imformative links that have only to do with the subject on this page.

Tuning for Performance - Computer-Controlled Quadrajet

inmalum.jpg

                                                                      Other pages on this site are>>>

Supported By Jesus